How to recover a Failed print using the log
So - you've had a weird failure, you accidentally disconnected a sensor, or your toolboard just hates you and doesn't want to work.
Problem is, you're 24 hours into a 27 hour print, and you need the part as well as don't want to waste that expensive filament.
Now what?
Well, depending on where your printer stopped, and what your part geometry looks like, its very feasible to actually recover your print, and here's what you can do to try!!! This process also requires your printer to be stable when unpowered, so if you have a flying gantry with belts, or a very heavy bed, this might not be for you.
- Alright, first, we're going to download the klippy log, to get our best chance. While you're at it, download the actual printed file as well, we'll need that for the next step.
- Next, lets make sure to restart the printer (assuming you fix whatever the issue was in the first place) and get the printer heating again.
Note: The faster you recover your printer, the more likely this whole process is to succeed! If your printer has fully cooled down or even half cooled down, your part may have lost adhesion and you'll be up the creek without a paddle.
Awesome. Now that the printer is heating again, assuming you got to it soon enough, you'll be able to restart the print where it left off.
Dig through the log to find the last executed gcode
Time to open up the klippy.log you downloaded in your favorite text editing program. I use notepad++ or VSCODE editor because they're somewhat sane to work with.
I typically then search "error" or what fluidd/mainsail gets me as an error blurb until I find the spot where it errored. Here's a screenshot of one such error:

Now that we have that error, we can then scroll down for the next interesting section we want, the upcoming and previous gcode in the queue.
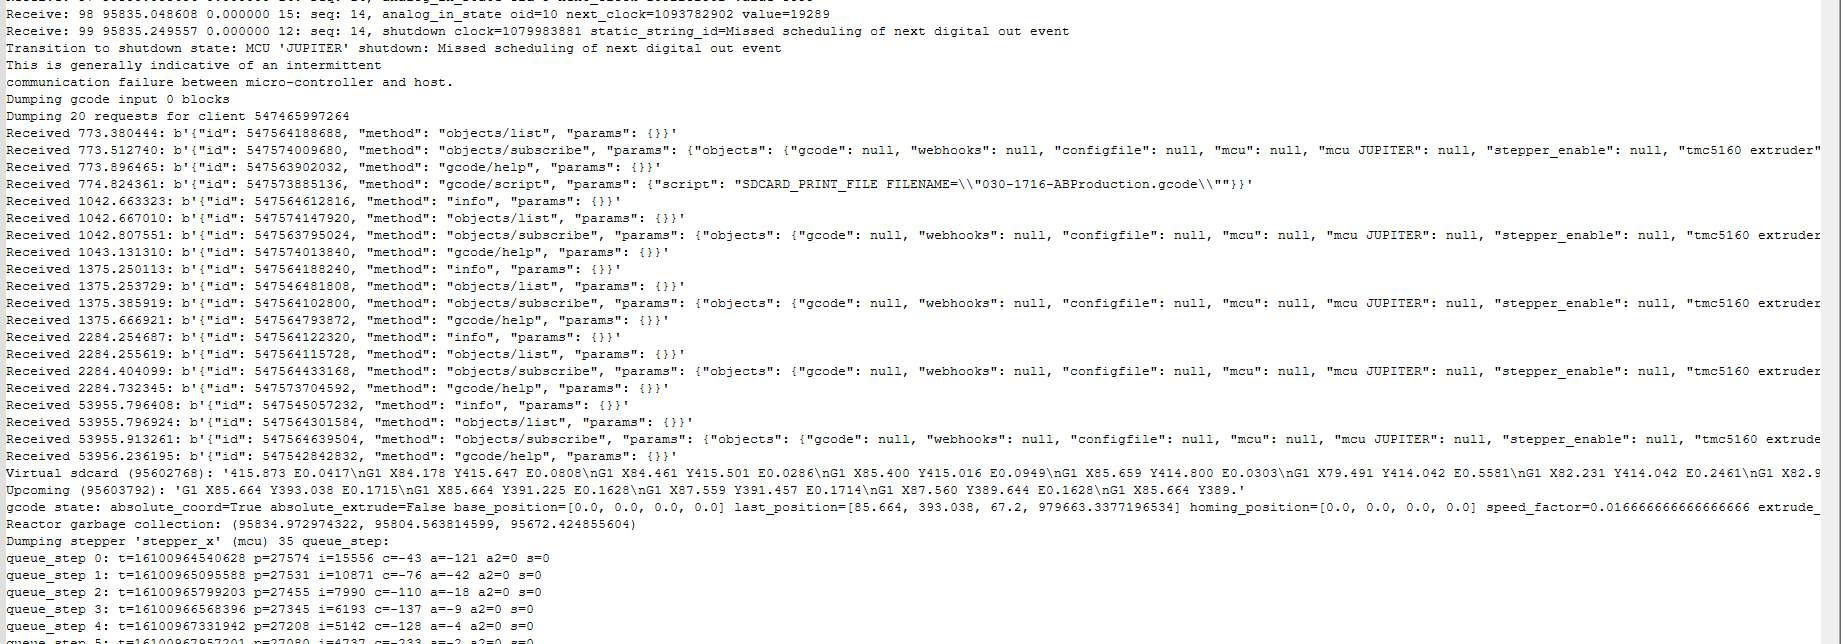
On the upper portion of the screenshot, you can see the error that killed the print, and any useful little tips that klipper/kalico thinks you should know to help fix things. In this case, I was working with an experimental toolboard and knew it was having issues. :)
Near the bottom of the screenshot is the part we want for the purpose of this guide - the "virtual SDCARD" and Upcoming gcode - these are the codes that it had in its queue and the codes that it was going to export.
From here, I'd highlight the first complete gcode, in this case, G1 X84.178 Y415.647 E0.0808, and copy it. We'll use this when searching in the file later.
Determining the Z Position
Next, we'll need to figure out the z location. I generically recommend having your console echo the z layer as well as the actual height of your prints into the console. This allows you to have the real position without any mesh height shenanigans or other macros affecting the nozzle location, but in this case, we'll use the last_position field, which is 67.2mm in the Z position.
If your error doesn't have a "last position" due to things like trying to resume a print while cold or out of position error, you'll have to carefully "override" the previously printed layers and sand/postprocess.
For example: Here's what's in my .gcode files that are exported to my printer. You'll have to customize this per slicer using their built-in placeholders, but this is what my as-sliced model looks like:
RESPOND TYPE=echo MSG="Starting layer at 0.300, index:1
Now, going into your console of your 3d printer, send the following command:
set_kinematic_position z={enter_the_height_you_found} With that, you've now told your printer where it is, and it will allow you to move your Z away to make your nozzle clear the print.
From here, I'd now move the Z-axis 10mm, seperating your nozzle from the print, and then homing the printer in X and Y to give it full knowledge of where it is in all 3 axies.
Nice - your printer is now fully in the recovery position, and we can get back to sending the gcode.
Note: If your printer was in a pause, your *actual* height will be whatever the previous height is plus the length of the pause.
Setting up the .gcode file to resume
Now, open the downloaded .gcode file from before, and we're going to search it for the correct location in the gcode to resume from.
I'd start off this search by finding the layer height, so search for something like Z{whatever_your_height_was} and praying that it shows up. You can also take a look and see if there is any automated exports from your slicer for layer height/number in the comments (similar to the section above)
Once you find the last layer your printer went to before it failed, *delete everything before this point*
When recovering a print, its likely *very bad* if your pre-print macros were to run, and the steps earlier were to find position and to heat it up, so we don't want any of those commands.
Now, search for the line of gcode we found before. In this case, we'd search for G1 X84.178 Y415.647 E0.0808
With luck, you'll find that line of gcode, and again, delete all of the lines of gcode before it, *except* for the line of gcode that moves your Z to your correct z height. More on that in a bit. With the deletion of all the code before this line, this will be the first line of gcode that your printer executes when you start this file in the printer.
Finishing the preparation
The earlier steps we performed were to have the printer locate in XYZ, and to have it heated. Since we have a print on the plate, we can't perform any Z axis tilt or meshing, so we're going to have to trust that our machine is solid and hasn't moved much. Again, If you cant trust that your printer hasn't moved in some detrimental way, this process isn't for you, and you'll have to start the print over.
Now, I normally will add a move to the center of your bed before dropping down to the correct z height like this:
G1 X{your_x_centerpoint} Y{your_y_centerpoint}So your gcode file will be
G1 X{Center} Y{Center}
G1 Z{your_Z_height}
G1 {your_gcode_line}
You can also elect to add a speed modifier to your gcode or execute this in the console/GUI before starting your print. The command is:
M220 S{percent} ; For 10% speed, M220 S10Once all your modifications are complete, save your gcode file on your pc, preferably with a modified name so you don't overwrite your previous file, and from here, you can upload it to your printer!
The final steps:
Alright - once your new file is uploaded, and you've verified that your printer is warm, fully homed, and ready to go, you can start the modified gcode, which should resume your print merrily. I recommend watching the print for the next 2-3 layers to make sure that your modifications bond correctly and nothing gets screwed up. If nothing appears to be weird, you're good!
After the print completes, Check the approximate location where you resumed and the layers after. Check for any weakness in the print and for how well the new layers stacked in the XY plane on the old ones.
And there you go! You've recovered a print and are ready for the next one!
Just make sure to fix whatever made this one fail in the first place :)